The Well Pump Installation Process, Step by Step for Oregon Homes
If you are buying a home on a private well near Gresham, or your pump just quit and you are facing a replacement, you want to know exactly what the well pump installation steps look like from start to finish. Knowing the steps helps you judge whether the work was done right, ask better questions during a well inspection, and understand what you are paying for. This guide walks through the full residential procedure the way a local crew would actually run it, from sizing the pump to the final water test.
One quick note before the steps. Most of this work involves heavy pipe, 240-volt wiring, and a sanitary seal on your only water source. Homeowners sometimes ask, can I install my own well pump? On a shallow jet pump, a capable person might manage it. On a submersible pump set deep in the well, a mistake can drop the pump down the hole or contaminate your well water. Treat this guide as a way to understand the job, not necessarily to do it alone.
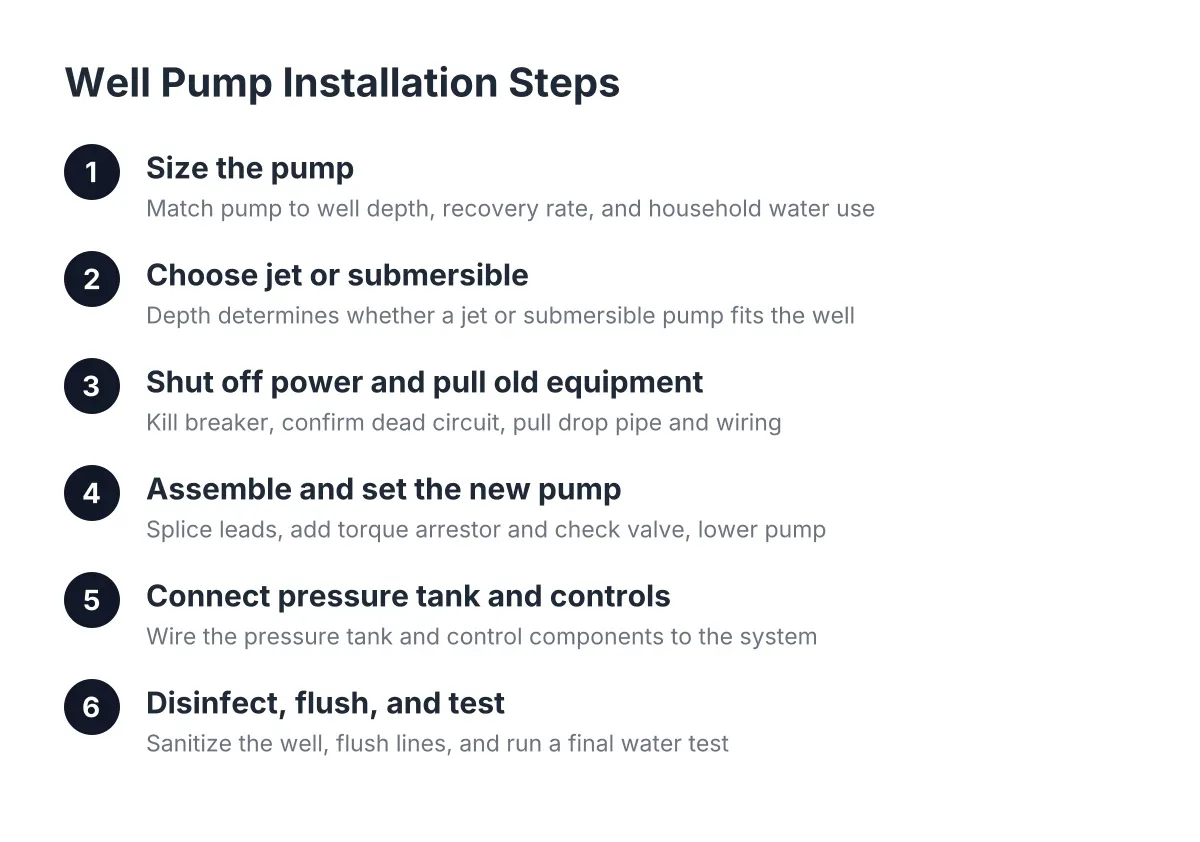
Step 1: Size the Pump to the Well and the Household
Start with sizing, because the most common installation mistake happens before anyone touches a wrench. A pump that is too small starves the house of pressure. A pump that is too big can pump the well faster than the aquifer refills it, running the pump dry and burning out the motor.
Sizing comes down to three questions:
- How deep is the water? The pump has to push water from the water level in the well up to your pressure tank. Deeper wells need more pumping power, which usually means more horsepower and more pump stages.
- How fast does the well recover? A well that refills slowly needs a pump matched to that recharge rate, sometimes with low-water protection so the motor shuts off before it runs dry.
- How much water does the house use? Count bathrooms, laundry, irrigation, and any livestock or shop use. A three-bathroom house with sprinklers needs a different pump than a small cabin.
Around Gresham and the rural edge of Multnomah and Clackamas Counties, in places like Sandy, Boring, Damascus, Corbett, and Estacada, well depths and recovery rates vary from one property to the next. Two neighbors a quarter mile apart can sit on different groundwater conditions. That is why generic manufacturer charts are a starting point, not an answer. If nobody has measured your well's depth and recovery, that measurement should come first. Oregon tracks aquifer conditions statewide; according to Oregon Water Resources Department, the state's Groundwater Hydrology Section maintains more than 400 observation wells and measures more than 1,200 additional wells to monitor groundwater. Your single well still needs its own numbers.
This matters more than it used to. According to U.S. Geological Survey, about 1,220 domestic wells in Oregon went dry or fell below pumping capacity between June 2021 and December 2023, and the true number is likely higher because reporting is not mandatory. A pump sized to a realistic recovery rate protects both the motor and the well.
Well Pump Installation: Choosing Between Jet and Submersible Pump Steps
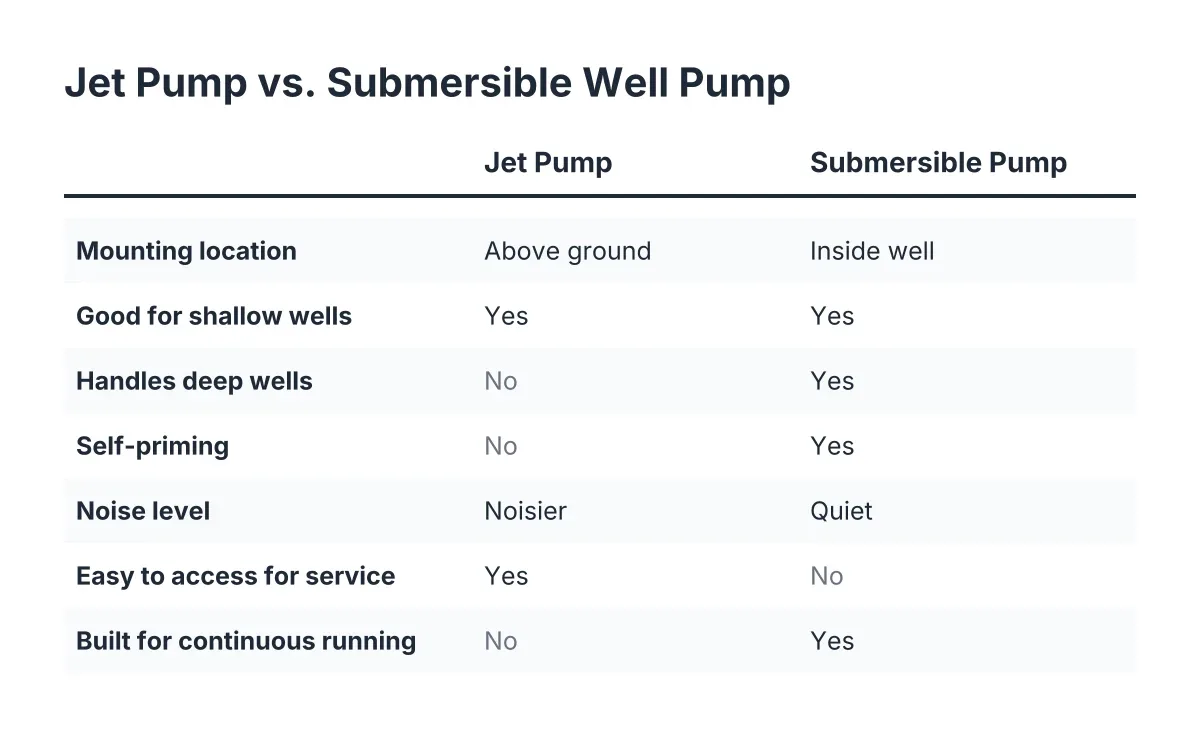
The depth measurement from Step 1 usually makes this choice for you. A jet pump sits above ground, often in a pump house or basement, and pulls water up by suction. Physics limits how far suction can lift water, so jet pumps fit shallow wells. Shallow setups use a single suction line with a one-pipe well seal, while deeper jet pump setups need two pipes, a suction line and a pressure line, with a two-pipe seal.
A submersible pump works the opposite way. It hangs near the bottom of the well on a drop pipe and pushes water up through multiple pump stages. Pushing is far more efficient than pulling, so submersibles handle deep wells, run quieter, and generally last longer because the motor stays cool in the water. According to Indiana Department of Health, residential well systems typically use a submersible pump paired with a pressure tank, which may sit in the well house, the home, or a crawl space depending on the layout.
For most Oregon wells of any real depth, a submersible is the right call. The main reasons to keep a jet pump are a genuinely shallow well or a tight budget on an existing jet setup that still fits the well.
Step 3: Shut Off Power and Pull the Old Equipment
If this is a well pump installation steps replacement rather than a new well, the old pump comes out first. Kill the breaker, then confirm with a voltage meter that the circuit is actually dead. Pump circuits run 240 volts, and guessing is not a safety plan.
Next, the crew opens the well cap and pulls the drop pipe, safety rope, and wiring. On a deep well this can mean a couple hundred feet of pipe with a motor hanging on the end, so crews use a pump hoist or pulling rig. Under low overhead, such as inside a pump house or under power lines, the pipe gets pulled and cut in short sections, over and over, which adds time to the job. Converting an old two-pipe jet system to a submersible means pulling both lines the same way.
This stage is also where a careful installer inspects what comes out of the hole. Corroded pipe, chewed wire insulation, or a pump caked in sediment all tell a story about the well's condition. For a pre-purchase well inspection, this history is exactly what you want documented.
Step 4: Assemble and Set the New Pump
The submersible pump assembly process happens at the surface before anything goes down the well. The crew splices the motor leads to the drop wire with waterproof heat-shrink connections, attaches a torque arrestor to keep the pump from twisting against the casing, installs a check valve so water does not drain back down, and secures a safety rope to the pump body.
Then the pump goes down the well on the drop pipe, one section at a time, with the wire taped to the pipe at regular intervals so it cannot chafe against the casing. Setting depth matters. The pump sits well above the bottom of the well, not on it, which keeps it out of the sediment layer and leaves room for connections. It also must sit low enough to stay submerged when the water level drops during heavy pumping.
At the top, the installer lands the pipe on a pitless adapter, the below-ground fitting that routes water sideways through the casing to the buried line running to the house. A sanitary well cap seals the casing against insects and surface water. On older wells, upgrading to a proper pitless adapter and sealed cap during well pump installation is one of the cheapest water-quality improvements available.
Step 5: Connect the Pressure Tank and Controls
Water from the well line arrives at the pressure tank, usually in the garage, crawl space, or a pump house. The tank holds a cushion of pressurized water so the pump does not kick on every time someone washes their hands. A pressure switch turns the pump on and off within a set range, and the tank's air charge must be set to match that switch.
A mismatched or waterlogged pressure tank is the hidden killer of new pumps. It forces the motor into rapid on-off cycling, which wears it out years early. A proper installation always checks or replaces the tank, verifies the air precharge, and confirms the pressure switch settings. If the home has filtration or a water conditioner in the pump house, those get reconnected downstream of the tank.
Well Pump Installation Steps for Disinfection, Flushing, and Testing
No well pump installation process is finished until the water is proven safe and the system is tested under load. Opening a well introduces contamination risk, so the final steps are not optional:
- Disinfect the well. The installer chlorinates the well and pump components. According to San Diego County Department of Environmental Health, this is standard after new well work, and the well should be run heavily afterward to flush out the chlorine taste and residue.
- Flush thoroughly. Run outside spigots until the chlorine smell is gone. This can take a while on a deep well.
- Test flow and drawdown. The installer runs the pump, watches how far the water level drops, then times the recovery. This confirms the pump matches the well's real recharge rate.
- Test the water. According to CDC, standard practice is to run the well extensively first, then pull a sample, so the test reflects normal well water rather than lingering disinfectant.
- Document everything. Pump make and model, horsepower, setting depth, pressure settings, and test results all belong on paper.
How long does it take to install a well pump? A straightforward submersible replacement on an accessible well is typically a one-day job. Deep wells, tight access, converted jet systems, or pressure tank replacement can stretch it further, and brand-new well construction runs on a longer timeline with drilling, casing, and follow-up visits spread over weeks.
What This Means If You Are Buying a House on a Well
Suppose you are under contract on a place outside Boring with a pump of unknown age and a seller who says the well is fine. Every step above is a checklist item for your well inspection. Ask for the pump's age and setting depth, the pressure tank's condition, a flow and recovery test, and a current water test. A documented well and pump inspection report turns "the well is fine" into numbers you can negotiate with before closing.
Cost context helps too. According to Angi, the national average well pump replacement cost is $1,898, with most homeowners paying between $975 and $2,821. Actual pricing depends on pump depth, horsepower, access, and whether the pressure tank needs replacement, so treat national averages as a sanity check rather than a quote. If an inspection finds a pump near the end of its life, that figure gives you a realistic repair credit to discuss.
Whether you are mid-emergency with no water or mid-escrow with no answers, the well pump installation process is the same sequence: measure the well, size the pump, set it correctly, protect it with the right tank and controls, then disinfect and test. An installer who can walk you through each of those steps, and show you the numbers behind them, is the one you want working on your water.
If you need well drilling, Clackamas Well Drilling can help.
Prefer to talk it through? Call (503) 782-5215 — a quick call is usually the fastest way to get a straight answer for your situation.